In 2004, Red Brick moved to its current home in Hudson, NH and made a large investment in screenprinting equipment. We have the capacity to print multi-colored designs on large orders as well as machinery to print custom team names and numbers. This process works well when you’re looking for a bold appearance, something colorful, eye-catching and easy to read.
Screenprinting is both an art and a science. Our artists and production people work together to bring you something that you’ll be thrilled to wear, give or sell! Don’t think that screen printing is limited to t-shirts. We can screen print sweatshirts, sweatpants, 1/4 zips, jacket backs, tote bags, bandanas and more. Our team can take your sketch, your idea, your vision and turn it into an amazing piece of art that’s wearable.
Here’s a breakdown of the process:
 Artwork Setup & Color Separation
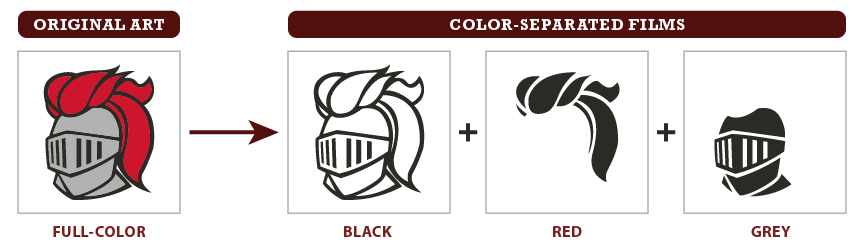
In order to screenprint your design, we need to set-up your artwork to be separated by color. Once separated, each color needed for the design will be printed onto its own film and then burned onto its own screen. This is why screenprinting cost is largely determined by the number of colors used. Once the films are printed, the order leaves the art department and moves over to production where it makes its way onto the press.
Using vectored artwork yields the highest quality print separations and is the most affordable and preferred method. We can also print color separations from a JPEG (or other rasterized image) but the image size needs to be very, very high-resolution in order to maintain quality.
See some examples here on our Custom Artwork page. The Nutfield Fire design is an example of separations from a JPEG and the other designs on the page are examples from vectored artwork.
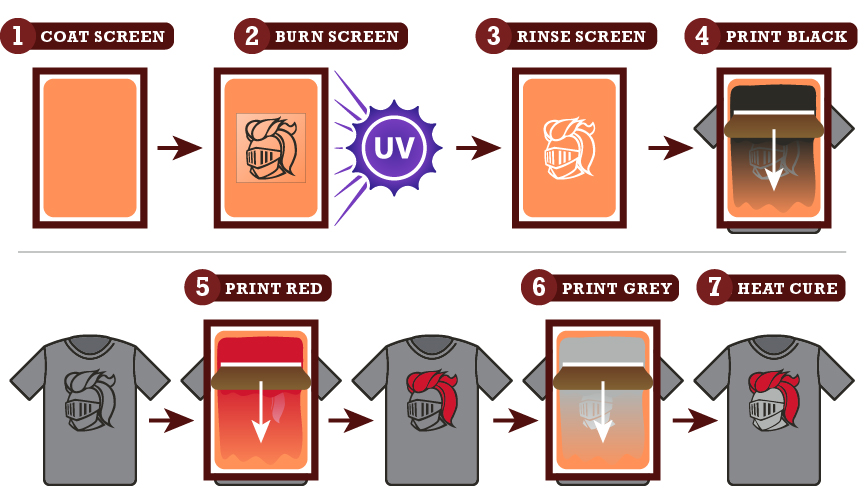
1. Photo Emulsion
The mesh screen is coated with a UV-sensitive emulsion. This emulsion can be cleaned-out and reapplied to reuse screens for future orders.
2. UV Exposure
The film for each color will be placed on its own screen and then exposed to UV light using a special machine. The UV light hardens the emulsion anywhere it reaches, but anything that is covered by the black on the film remains soft.
3. Rinse
The screen is then rinsed. The soft, unexposed, emulsion washing away and leaving space for ink to pass through once the screen is on the press.
4. Registration and First Print
The screens are then loaded onto the press where they are registered to make sure that all the colors line-up. Screens are filled with their respective ink colors and a squeegee pushes and pulls the ink through the screen and onto the shirt.
5 & 6. Print Other Colors (if any)
The shirt moves to the next screen and is printed with that color. The process repeats until the shirt gets printed with all the colors needed.
7. Final Shirt and Curing
You now have your final printed shirt! Before you can wear it though, it must take a trip through our special high-temp drier. This drier cures our inks and allows the shirt to be fully handled, folded, boxed, and on its way to you!